For My Total Import & Restoration Cost Spend So Far ... Click Here

The First Gig at the Octopus Bar

Photo
I drove the DeLorean to it's first 'gig' at a 1980's night at the Octopus Bar in Crawley. I almost didn't make it because of a clutch line/fluid problem that keeped the car in neutral for 20 minutes just 2 miles from the event. A great night with friendly people and lots of interest in the car.

New Seat Covers

Photo
I contacted DeLorean.com and got them to FedEx a set of grey seat covers to my wife whilst she was on holiday in New York (so I wouldn't get clobbered on the postage & import tax). I'll fit these once the headliner and door seals have been replaced.
Photo
It would have been nice if Delorean.com had completed their new instrument binnacles, as I could have imported one of those at the same time. Once the seats are fitted, the cracked instrument binnacle will be the only cosmetic thing that lets the car down.

The Eco Friendly DeLorean

Photo
Using my car to promote opposition to an environmentally unfriendly installation. The Car Crawl from Newhaven to Brighton was one of many peaceful protests by Sussex residents against the proposed incinerator installation in Newhaven, East Sussex.
Photo
After seeing the notice, 'The best dressed car wins...', the theme A 'Bleak Future' For Sussex came to mind, and it just seemed the most appropriate 'play on words' for promoting a serious issue of this kind on the side of a DeLorean. For more facts about the protest, please visit : www.dove2000.org

Views This & Other Events - Presentation

Let There Be Light ...

Photo
In the garage for a couple of checks :-
  • Reverse Light Switch Fitted (In Photo, Top Right)
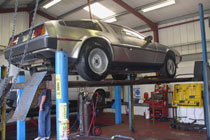
  • Oil Change + New Filter
  • Engine Tune Up & Lamda Sensor Check
  • Belts & Fuel Line Check

Photo


The Result

After the initial difficulty of sourcing an Oil Filter by my garage, a Ford Mondeo Zetec filter by Crossland was used, which seems to work fine.
Photo

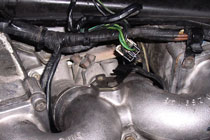
They also reported that the emissions were checked, and could also be adjusted via the 3 screws on top of the engine (I really need to research what these are). The lambda sensor sounds like it does need replacing. Also, the catalytic converter may be inoperative so a bypass kit may be the best option, which would also take the cars preformance to the next level.

Resurrection... with a Paper Clip (Inertia Sensor By-Pass)

Photo
After booking the mechanic to look at my possible fuel pump problem, I decided to check the 'Glove Box Service Manual' that came with the Electronic Schematic and went through all the check points under the 'Engine dies suddenly...' section.
I followed one of the guides and disconnected the cable from the inertia sensor (2" square black box located above the foot pedals next to the speedo cable) and then connected the black wire to the black/purple wire with a paper clip and turned the key.

Photo
The car sprang to life for the first time in 7 weeks !
I taped a piece of wired in place as a temporary fix, but to add to my confusion, further down the wire I found an existing cut-n-twist of these two wires meaning that at some point in the past, the inertia sensor was permanently bypassed. But for some reason this connection was no longer working. An inertia sensor has now been added to my shopping list. Maintaining this car is certainly becoming a source of learning for me.

Friday The 13th : Engine Dead

Photo
I drove out of my garage on to the road and the engine cut out and wouldn't restart. Eventually managed to get 3 volunteers to push my DMC back up my drive and back into the garage as it wouldn't be insured sitting on my drive (That's classic car insurance for you). Could be a result of the recent distributor cap and plug replacement or a dodgy Fuel Pump / Connections ???

Electrical Parts Replaced + MOT

Photo
The battery finally packed up. A new one with the side terminals could only be sourced at DMC Ltd (Previously DMUK), so decided to pick up a few other items in an attempt to remedy the engines 'spluttery' performance :-
  • 1 Battery
  • 1 Set Of 6 Spark Plugs
  • 1 Distributor Cap
  • 1 Rotor Arm
  • 1 Reverse Light Switch

Photo
Whilst at DMC the guys highlighted that the performance problem may also be a faulty Lambda Sensor.
On one of their cars they demonstrated the loud 'clicking' sound that should eminate from the right hand side of the engine bay when the key is turned to the first position.
Sure enough, there was no clicking from my own engine bay.


Photo

Tasks undertaken during this years MOT :-

  • MOT
  • Clutch Fluid Bleed / Change
  • Fitting Of The Distributor Cap
  • Fitting Of The Rotor Arm
  • Fitting Of The Spark Plugs

It passed the MOT with no advisory notes :-)
The car runs smoothly now without any spluttering and I finally have decent acceleration too ! - Perhaps the Lambda sensor is fine after all (?)

Back To The Future DMC In Cornwall

Photo
At the Cornish Goldsmiths in Cornwall, amonst other things on display, they had a C-3P0, the Aston Martin DB5 from James Bond and a very good example of a DeLorean from Back To The Future (Part 1).
The VIN number of this one is SCEDT26T7CD010680.

View This DeLorean In More Detail

Empty Clutch Fluid Bottle !

Photo
Because of my total lack of knowledge about cars and clutch problem was soon fixed by filling up the totally empty (and bone dry) fluid bottle with DOT4 Clutch & Brake fluid. A few 'pumps' on the very limp clutch pedal and functionally gradually came back again. I re-checked the bottle and the level didn't seem to drop at all so I'm hoping it is the fluid that has remedied the problem. Time will tell.
Photo


I could have taken it for a spin, but for the totally flat battery after sitting there for a month.
I've been too wraped up in the cosmetic side over the last year or so, I think it's time to research the mechanical and periodic maintenance side of things (Designing my long-over due Components Parts section will hopefully enlighten me).

Clutch Peddle Failure ?...

Photo
I started my car and found the gear stick needed a hard push to get it into 1st gear, but even with the clutch press to the floor the car began to move forward slowly. I lost all functionality in the clutch altogether with the gear stuck in 1st I drove up the road.
I managed to slam it into neutral, but had to get my car back inside my garage.
Photo

To get back, had to deal with an up-hill junction, so had to force the engine to stall on the approach. When all was clear, l started to engine and slamed it in gear which made the car lurch out of the junction (It must have looked so impressive to the passer by !!!!).
Got it back on my drive and the clutch started working again (!). So I quickly got in back in my garage.

Bonnet & Rear Louvre Struts Fitted & Tested A Stainless Cleaner

Photo
I finally fitted those 4 other gas struts (a 5 minute job !) and adjusted the lourve latch so that it locked correctly. Polished the car with the new Lakeland Stainless Cleaner spray which, as a bonus, had a 'Back to Black' effect on the rear louvre and the other black plastic parts.

MOT & Road Tax Time Again (Has It Been One Year Already !)

Photo
First of the pre-MOT fixes is a new right-front indicator bulb and the re-connection of the headlamps. At first, I thought that the guys who re-sprayed my front fascia last August had connected them incorrectly, but after removing the lights and grille, nothing seemed to be connected wrongly. It turned out to be a blown 20A fuse in the end (I guess I should have checked that first !). I decided to replace all the fuses at the same time.


Photo
That front-left tyre is damaged on the wall and probably won't make it through this time round (last year those guys at the Southampton Port drove it off the boat whilst it was deflated - Bless 'em). I decided to get a couple of Pirelli P6000 front tyres from Tyres Online in readiness for the guys at the garage to fit before the MOT. Not forgetting the temporary mounting of my front licence plate on the morning of the MOT as well !
A couple of strips of aluminium, 2 Nuts & Bolts and 20 minutes later, that was done !

Photo
Other non-MOT works included the Steering tracking (0.5° Toe-in across both wheels) which was left over from the recent front spring change.
The brake fluid also needed draining and re-filling due to two occurances over the last year of having to frantically pump the brakes to stop the car (!)
I guess there could be a bubble in there somewhere.
The reverse light switch is playing up again (but apparently not needed for an MOT Pass - Weird).

IT PASSED

Inspection Advice : To change the old corroded Tie / Track Rod Ends attached to the new steering rack and to keep an eye on the Brake Cylinder as this may also be part of the previous brake problem (I'd better keep a safe distance between myself and the car in front !).

My Low Profile DMC Just Got Lower !

Photo
After browsing the web for front shocks, I found that the Mid-State DeLorean Club in the US had a full set of all 4 Shocks for only $285 + $40 Postage (approx. £180). To avoid the customs/tax it was sent insured for only $30 and labeled as 'Gift : Car Parts'.
I didn't have a Workshop manual, but Marty Maier of Mid-State DeLorean was extremely helpful in providing me with all the installation information and the 55 torque values for the bolts, etc.

Photo
I booked it in to my local garage for the shock and spring swop-out. Finally, time to use those new lowered front springs I bought from DMUK in October last year. I opted for the rear shocks to be set at 5". The full Range was 5.5" (Stock height) down to 4.5" (1" Lower than stock height).
Photo

The cost of fitting was £00.00.


The Result

The car actually feels a little more modern now whilst driving, with no more bangs or thuds from those small pot-holes in the road. Also, a new feeling of stability across all 4 wheels as opposed to the previous, stiff 'buck-board' feeling to the car.
Those new lower front springs also mean no more driving my DMC with it's nose in the air ! - Now approximately 1.5" lower at the front and 0.5" lower at the back.

Rear Puncture

Photo
I arrived home in the evening to a loud hissing sound and soon found a large metal object sticking out of the rear/left tyre.
With the words of my insurance company ringing in my ears '...not insured, if not garaged', I got it in the garage just in time before all the air had escaped.
Kwik-Fit couldn't get a replacement Bridgestone tyre, so a Pirelli P6000 seamed to be the only option at £130 !
The guys on the DOC-UK forum recomended Tyres Online, so I order the same Pirelli P6000 tyre + delivery for £92.59 ! and those helpful guys at Kwik-Fit fitted it for free (They shouldn't really do this, so be sure to tip them enough for a pint or two if you use these guys !).

Removing 'Rust Spots' From My Bonnet

Photo
After descovering Rust spots all over the bonnet of my car. Mild Steel contamination was suggested as the cause by some helpful people on the UK DOC Forum. With the aid of 'Wonder Wheels' alloy wheel cleaner and a 3M Scotchbrite Pad the hundreds of rust spots were removed, and my bonnet looked like new again. Click here for the guide.

Fairwell John Z. DeLorean

Photo
The 'Revolutionary Man' of the car industry and inventor of the DMC-12 died today aged 80.

Good-Bye HVY MTL ... Hello, The Less Impressive, OWV 38W

I received the call to pick up my Road Tax, Stamped MOT, and V948 Reg. Plate Authorisation Certificate from the DVLA, and informed my insurers of the Registration Number.

Photo
It's now FINALLY Street Legal !!! - My UK Registration Certificate (V5C) arrived 7 days later.
Unfortunately, the Irish number plate 'PCZ 5789' that I was thinking of upgrading to, was sold a couple of weeks back (A match for my VIN No. 5789).
I decided to have the slogan 'Where We're Going, We Don't Need Roads !' added to the rear plate and 'DeLorean DMC-12 : No. 5789' added to the front, so I placed my order with DMUK.

UK Registration

Photo
The DVLA Form V55/5 seemed very confusing, and the guide was of no help what so ever. I would need a degree in motor mechanics to work out all the information it appeared to be asking for.
After contacting the DOC Newsgroup for advice, I was told that I only needed to fill in 25% of the form.
I have added a guide to all the DeLorean related DVLA V55/5 form filling and Required Documentation at the end of the Importing section here.

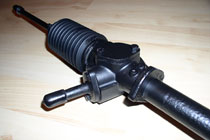
Steering Rack Replacement & MOT !

Photo
Time for the rack swop out and MOT today !
I placed the new steering rack behind the seats, jumped in the DeLorean and turned the ignition key and .... nothing !!
Nooooo ! ... What's wrong now ???!!!
The dash lit up and there was a loud repetative clicking sound from the engine bay every time I turned the key. Surely it can't be the battery could it, as the dash still lights up ?

I phoned my brother who assured me that the symptom was that of a low battery. I grabbed a battery out of my other car and used the jump leads. One turn of the key and I was instantly back on track again !!! - With the car being tended to, I anxiously awaited the conclusion of the rack replacement and MOT...

Photo

IT PASSED - Finally !

And not only that, the garage didn't charge me for the re-test (again) !
The cost of installation was only £58.75 for 2 hours labour. They normally get the tracking done by Kwik Fit, but they couldn't do it. They said the tracking looked fine though. I'll get that done during the Front Shock and Spring replacement.

Now onto the next stage, UK Registration...

Final Steering Rack Diagnosis

Photo
Whilst in for the fascia repaint, I asked the garage to give their opinion (the 3rd one) on the condition of the steering rack. They confirmed that they would not pass my steering in an MOT.
Time to get my car sorted out by DMUK again. But because of the difficulties with getting further temporary road cover from my insurers AON. My best option was to get the parts posted from DMUK and have the installation done locally.
Luckily for me, DMUK had an old Steering Rack in stock so all I would need to do is swop my one out. They sent that off to the refurbishers, with the finished result being sent directly on to me. I also ordered a set of lowered front springs in readiness for the leaky front shock replacement (hopefully, this side of Christmas).

Restoring The Front Fascia : Re-Painting

Photo
After sitting around in my garage for another month, it was time to get the sun-baked front fascia re-sprayed. A local car bodyshop had the equipment to digitally match the colour to within 99% of the original, plus match that half matte/half gloss finish. I supplied them with the paint code specified in an old DMC Service Bulletin for a possible reference.

To view the final paint specification used Click Here.

The finished product appears to match the original colour exactly. The paint texture seems to be slightly more of a matte finish than the original. But the plus side of this is that the natural 'rippled' surface of the vinyl is not visible anymore.

Restoring The Front Fascia : Straightening

Photo
It was time to get the front of the car looking as good as the back, so I removed the 4 headlamps and grille, then started the process of straightening the front fascia in readiness for the re-paint.

To view the process I used Click Here.

Prom Night

Photo
My Sister wanted to arrive to her prom in something a bit special. But, with not my DeLorean not being totally road legal yet, that could prove to be a little... risky. Mmm ...

It Failed The 2nd MOT !!!

Photo
The problem was that dreaded 'Steering Rack worn to excess' again. The MOT tester was very simpathetic and didn't charge me this time (!)
He explained that there was 'play' in the rack rods. They are not stable in the up and down direction (back and forth - left and Right was OK). All the other areas passed. After emailing Martin from DMUK, he suggested that it could just be the 4 retaining bolts that need tightening.
I may try and get the local garage to assess the problem, as AON Insurance have refused to give me anymore Temporary Cover Notes to drive it to garages. Talk about an imposible situation.

Rear Lighting Fault : Bad Earth Connection

Photo
Well, time to sort those left-hand tail lights out.
I was getting a slight illumination in bulb L(3) when using the Fog-Lights R & L(4), and when using the Rear lighting, Brake Lights and Fog-Lights together, blub L(2) would stay illuminated with the foglighting left on and then the lights on the lefts hand side had a mind of their own from then onwards.
The fault was finally diagnosed as being a bad Earth connection between the bulb holder rivets and the actual tail lighting circuit board. After linking all the earth points on the back of the circuit board (a chain, from one bulb holder earth-side rivet to the next) via a wire and a blob of solder, this seemed to fix the problem. So fingers crossed for that MOT.

New Speedo, Door Struts, Fuel Gauge, Etc.

Photo
Well, I got it back from DMUK, they also fitted both the door pistons for me.
With the Steering column nice and secure, the whole car feels much more stable to drive, with no more annoying rattles whenever I hit a dip in the road. It is also nice to be able to see my speed and fuel reserve for the first time and the mileage clock isn't stuck on 20,199 anymore. Plus, the doors finally stay up !!!

Photo

There seems to be a problem with the Fog-Light functionality on the rear left-hand side, as the other rear lights seem to be receiving a slight current. And with all the lights on, it's basically all over the place.
The next day I was confronted with a flat front-right tyre, but I pumped this up and it never deflated again. - There must have been some grit in the valve or something (?).

Off To DeLorean Motors UK For Upgrades

Photo
A very early start to get to Delorean Motors UK in Stevenage before the M25 morning rush hour. I was sure that I'd found the right place by the 5 other Deloreans parked outside (Becoming the 2nd, 3rd, 4th ... DeLoreans I had ever seen).
After informing DMUK (Dave Woodyard and Martin Gutkowski) of all the things I knew would need doing, I decided to bite the bullet and get as much done as possible (within my budget of course !) :-


Photo

Photo
  • 1 Possible Steering Rack Re-Build (Whilst I was there, DMUK stated that it looked fine and the MOT station may have just wrongly diagnosed it as 'worn to excess' from feeling the steering wheel wobble about).
  • 1 New Steering Bush.
  • 4 Alloy Wheels Refurbished.
  • 2 New Trailing Arm Bolts.
  • 2 New Front Outer UK Standard Lights
  • 2 New Front Inner Lights with Outer Halo Ring for UK 'Side Light' function.
  • Side Indicator Functionality on the side lighting strips.
  • 1 New Reverse Light Switch.
  • 1 Reconditioned Speedo Angle Drive
  • 1 New Speedo Lower Cable - Braided Stainless Steel
  • 1 Fuel Sender.
  • 1 DMC Key blank (best to have a spare)

Another anxious wait for the work to be done over the next week and that dreaded MOT report. Hopefully next week will bring some good luck. Fingers crossed (again). The Gas struts have just arrived from PJ Grady today (With an import tax bill of £35 !). Typical, I've currently got no car to put them on.

UK Fog Light Installation & Intermittent Hazard Light Fault

Photo
Still no sign of the new gas struts, so it's a weekend of straining to get out of the car, banging heads and proping up doors with broom handles again (!).

Photo
I made a cardboard US plate reg. no. 'HVY MTL' for the rear panel to keep the police off my back whilst I drive the 80 miles to my brothers house. I'm not sure whether this US registration number was official in the US (as shown in the Ebay pictures), but it's better than no plate at all I guess.
Photo
With my brothers guidance and electrical knowledge, plus the essential DMC Wiring Schematic, we successfully got the Rear Fog light modifications done, the two broken horns replaced with a single one and rectified the left hand side (front and rear) Hazard Light fault. Basically the hazard switch contacts needed cleaning (watch out for those contacts and springs when you pull the thing apart !).The Headlight 'UK Side-Light' modifications still needed doing and we noticed that the Reversing lights do not receive any power. The switch was not accessible so it's another job for Delorean Motors UK.

Electrical Wiring Schematic

Photo
Well, apart from the occassional engine turn over, my DeLorean has been sitting in my garage for the last 20 days. 6 New Gas Struts are on their way from P.J.Grady in the US. Hopefully they will arrive before the weekend, which will be the one for getting those UK fog lights done and hopefully the other electrical related things. I received an Electrical Schematic from Zilla products today, so that should make things easier to trace, check and modify. Then it's off to DMUK in Stevenage on Tues 15th June for the Steering Rack Rebuild, New Steering Column Bush, New Trailing Arm Bolts and Wheel Refurbishments to be done. If all this is completed successfully then it should be MOT time again very soon and then the registration process begins.

Sourcing A Replacement Steering Rack

Photo
Well I've had some responses for the DOC-UK intranet newsgroup regarding the Steering Rack. Basically there are various sources that assure me that it can be restored/rebuilt here in the UK, as apposed to replacement. The main response was from Martin Gutkowski who co-runs DeLorean.co.uk. Their internet site states that it'll probably cost about £150-£250 for a rebuild, Martin has also advised me of the £70 labour costs (2 Hours Work). They will also be able to deal with the majority of the other faults. But, after the steering cost, I may not be able to perform those just yet. I've got to concentrate purely on the MOT stuff, plus those doors and then get the car registered.

Air Conditioning, Oil, Etc.

Photo
This is the source of the weak Air Conditioning, located under the front-right wheel arch. This will need re-charging. The mechanic also, cleared up the mystery of the oil on the underside of the engine, basically this PRV engine type is renound for slow leakages and even if you replaced the seals, it would probably still let oil pass by. He also commented that the PRV engine on my car ran quietly, as most of them can rattle quite loudly.

The First UK MOT

Photo
I drove it to a back street garage recommended by the guy at Kwik-Fit for an MOT check. Of course, knowing it will fail because, at very least, there is no Fog lamp on the back and also the headlights will need some alteration. Surprisingly, I was told that the speedo and fuel guage did not have to work to pass the test (!). I asked them to check the oil leak and also check all the rubber hoses. Hopefully the list to things that will need to be done to get it UK registered will not be too severe. Come on, lets have some good news...

The Result

Photo
Well, not disasterous. The Fog Lights (of course), Front side lights required, Horn non-functional, new wiper blades needed and Nearside Front steering rack is worn out (See Pic). That would explain that slight feeling of instability I was getting when steering sharply (I had originally put it down to not being used to a non-power steering car). After this news, I was glad to here how in good condition the rest of the car was in (the tyres, frame, brake pads, etc). OK, it's time to consult the DOC-UK Online newsgroup for advice on what to do next...

The Original Door Gas Struts

Photo
The door struts don't seem to function at all so the car looks like a lopp-eared rabbit. The replacement of these was low priority as I was going to do the cosmetic repairs last. But, the weight of these doors are becoming a strain on my back everytime I get out of the car. So, I'll order replacements form PJ Grady in the US once I have an inventory of the other parts I'll need from them.

Condition Of The Wheels

Photo
3 of the 4 Wheels are suffering from slight oxidisation. This may explain why the front left wheel was deflated when I picked it up, as alloy wheels occasionally oxidise on the rim and let air pass by. Purely cosmetic and probably the lowest priority job on the list, but these wheels could do with being re-treated / power coated before the year is up.

No Speedometer

Photo
Could this be part of the Speedo problem. It's best to start here and work backwards up the 3 separate portions of the speedo cable.

An Oil Leak ?

Photo
Oil underneath the engine. A leak maybe ?
This will need to be checked, but as the engine feels fine whilst driving, I'm hoping the reason for this is not a serious one. Fingers crossed.

Trailing Arm Bolts

Photo
The Trailing Arms Bolts seem to be in good condition, but are they distorted at all?
It will be a good idea the replace them anyway with new aircraft grade ones as the original stock bolts were weak in design. The forces produced by driving and braking can take their toll on these bolts and periodic checks even after replacing them is a very important.

The Frame Inspection

Photo
The frame appears to be a good condition with only slight rubberised coating flaking and minor surface rust.
Photo


More minor surface rust. With the English climate being what it is, this will eventually need to be treated.

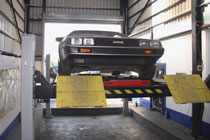
First Garage Visit : Kwik Fit

Photo
Up on the ramp for the first time to check on the condition of the frame and any other problems that might be immediately obvious.
Kwik-Fit allowed me the use of their ramp for free to check that the car was not a danger. The digital camera was a invaluable at this point to record the entire undercarriage. They advised me that they couldn't do work on specialised cars but pointed me in the direction of a local garage that could.

Cracked Binnacle

Photo
It's the same old cracked binnacle problem that effects 95% of all DeLoreans. The Tennessee sun has damaged my one beyond repair. Replacing this is not the highest priority on the list of fixes, but it is an annoying one that confronts everyone who looks at the car. Annoying enough to purchase one as soon as I find one. Hopefully, this can be replaced whilst the faulty speedo and fuel guages are being serviced (?).

Warped Front Fascia

Photo
The usual slightly warped facia over the inner headlamp.
I'll attempt to straighten this out with a Hot Air Gun and add strengthening rods later on. There also seams to be condensation in this inner lamp.

Sun Baked Front Fascia

Photo
The sun baked top portion of the front facia is discoloured but still very smooth.
I'll track down the paint formula for this and get it re-painted as soon as I can. It is a low priority job, but it is an annoying thing that confronts everyone who looks at the car.

The PRV-6 Engine

Photo
The rear engine bay seems nice and clean for a 23 year old car, but what do I know ?
From what I can tell at this point the only faults seem to be non-functioning speedo, horn, electric windows or door lighting. The fuel guage permanently in up position, the stearing column has some up and down movement, the Air Conditioning is weak, no support from door or bonnet struts, slight cracking on the driver seat and the bonnet release cable handle detached (I have to release it using pliers).

A Quick Clean Up

Photo
Using only water, I removed all the dust that had settled on the car during its trip. The stainless steel bodywork seems to be in excellent condition. The only noticable flaws (and you really have to stare at it to see it) are a very slight warp on the roof 'T' panel. Re-brushing of the entire bodywork may be an option to make the car look 100% immaculate, but that is costly and not really necessary.

Home At Last

Photo
VIN.5789 is finally home. After its long journey, from Nashville Tennessee to Jacksonville Florida, then across the Atlantic on the Hual Tropicana to Southampton and the 80 mile drive home (without number plates).

First Contact, At Southampton Dockyard

Photo
3:45pm at Southampton Docks with just 15 Minutes until the docks close, I signed the release form. Walking through the storage compound with my camcorder running, I found what I was looking for behind a very large 4x4 truck ...


Photo
My DeLorean DMC-12
This picture (taken from video) captures the first time I actually saw and managed to inspect my overseas purchase. Infact it's the first time I had clamped eyes on any Delorean apart from on TV or film.
Photo


The first thing that surprised me was how 'flat' this car actually is (114cm in Height according to the offical spec.), although standing next to a huge 4x4 and having a flat front tyre probably helped to exagerate this.
Photo


Also, what I had heard was true, how a DeLorean looks far more impressive in person than in any photograph. The reflections seem to skip across the grain of this stainless steel car as you move around it...
Photo


Right, enough staring at it. Time to get that tyre pumped up and on the road, as the docks close in 10 minutes !!!

My Turn To 'Live The Dream' ...

Photo
Call it a mid-life crisis, or a bloke in his mid-thirties trying to realise a childhood dream ... After researching the costs and following various DeLoreans for sale on Ebay over the last 18 months, it was time to finally get my own. On February 29th, one came up for sale in Nashville Tennessee (Item 2463941031). On March 7th, the auction closed with me as the highest bidder, but the Reserve price had not been met. A couple of emails later and my offer of $14,000 (approx. £7,800) was accepted and the process of payment, transportation and importing began. Buying something, for such a large sum of money without actually personally inspecting what you are buying beforehand may seem absolutely foolish to most people. But unless you are prepared to spend even more money travelling to the USA to inspected the vehicle before bidding with the added risk of losing out in a possible Ebay bidding war, then this really is the only way to buy. To view all the processes I had to go through after winning my bid Click Here.