

Do It Yourself Guides For The Non-Mechanically Minded
- Removing 'Rust Deposits' From The Bodywork
- Straightening The Front Fascia
- Re-Painting The Front Or Rear Fascias
- Binnacle & Instrument Cluster Removal
- Electrical Wiring Diagram
Removing 'Rust Deposits' From The Bodywork
The Problem

This rust spreads deep into the grain of the stainless so ordinary soapy water and a brio pad won't even touch it.
Tools Needed
You will need the following items :-- 'Wonder Wheels' Alloy Wheel Cleaner
To Desolve The Rust (From Halfords) - 3M Scotchbrite Metal Polisher Pad
It's The Dark Red 3M Pad, To Remove The Rust (Available From B&Q).
The Procedure
Pour a small amount of the cleaning solution into the cap. Tear off a piece of the Scotchbite pad, dip it in the solution and then apply to the bodywork, You can clean an area quite firmly as the steel is pretty tough, but ONLY move the pad back and forth in the direction of the stainless steels grain. Once you've cleaned the first 1 inch strip, LIFT THE PAD and concentrate on the next strip. Do not be tempted to gradually zig-zag across the surface, because, in the sunlight you won't notice it, but at night when lights are shining on the surface, you'll see all those zig-zags !Note : The stainless steel surface will turn to a darker colour when the solution is applied, but washing with soapy water right after the cleaning process will shine in up again. You can use this method to 'freshen-up' your whole car, but take care not to get the solution on the facia paintwork or rubber window seals. Remember, follow that grain !
Straightening The Front Fascia
The Problem
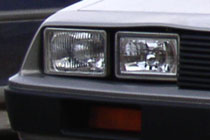

The problem is not an age related one. But, due to poor design and the hot U.S. summers. It's a problem that occurred soon after the cars rolled off the boat from Ireland back in the 80's and no doubt would have been rectified if the production run had lasted more than 3 years (even the BTTF Delorean has one in some of the scenes).
The long term, and hopefully final solution, is to straighten and then reinforce the area over all four headlamps. This process is a little more involved, but not too complicated.
Materials & Tools Needed
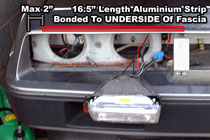
You will need the following items :-- Aluminium - 2 Pieces of 'Flat Bar' Dimensions 1/8" x 3/4" x 16.5" Long.
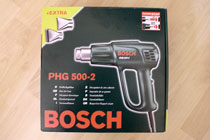
Nothing larger as the headlights will not fit back in. Available for less than £10 from a Metal Fabricators or Machine Shop. Don't buy from a metal stockist as they tend to sell in bulk and will charge you a fortune in admin (I was initially quoted £35 !!!) - Heat Gun : Hot Air Paint Stripper - Bosch, £20 from B&Q
- Plastic Spring Clamps 3 or more - £2 each from B&Q
- Strong Adhesive : Evo-Stik 'Serious Stuff', it's like 'No More Nails' but works with Non-Porous materials - £6 from B&Q
- Screwdriver : 'Cross-Head' (Phillips) type to remove the headlamps.
- A Heavy Object to hold down the re-shaped fascia until it has cooled down.
A car battery or object of similar weight will do. I used a water compressor unit. - A Flat Piece Of Wood to place between the heavy object and the Fascia so that even pressure is maintained while the temperature cools. A length of skirting board would be ideal.
- Sand Paper to 'roughen up' the surface of the Aluminium and underside of the fascia for improved adhesion.
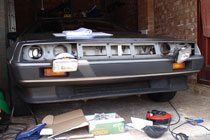
The Straightening Procedure
Heat the warped area with the Heat Gun on the lowest setting (usually about 300 deg C), run the nozzle back and forth across inside edge of the warped area, holding it at least 10cm away from the fascia (and watch out for any wiring).

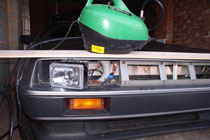
All you need to do now is quickly turn the heat gun off, place the length of wood across the top of the fascia and then place the Heavy Weight on top of the wood (making sure it won't all slide off !!). Once the fascia has cooled down (approx. 5 - 10 mins) then the fascia should retain it's shape once the weight is removed. If you feel that it needs further re-shaping, repeat the process again.

The Reinforcing Procedure
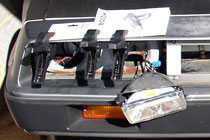
Shape the aluminium strips to fit inside the fascia. To position correctly, you need to push one end of the strip into the grille side fascia lip first and then slide it into position.
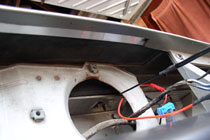

Please Note : If you don't wish to add reinforcements, then you could actually do the re-shaping without taking the headlamps out. Place a 'shield' over the headlamps and heat the top surface of the fascia, then once soft, just place the wood and weights on top.
This may be something that you have to do on a 1 or 2 yearly basis should the problem arise again, also repeated heating of the fascia surface may effect the paintwork over time.

It's your choice, as both methods have yet to be fully tried and tested, especially the durability of Evo-Stiks 'Serious Stuff', when subjected to both UK Summer and Winter climates.
Only time will tell, but 2 years have now passed since I did mine and it's still looking great. Good Luck.
Re-Painting The Front Or Rear Fascia
The Original Paint Specification

Ditzler Automotive Finishes
Code : DAU33584
Colour : 'Silver Poly'
Ditzler is part of PPG Automotive Coatings.
The bad news is, the original Ditzler DAU paint tints were discontinued and updated to the very similar DBC33584.
A Modern Alternative
ICI Autocolor became part of PPG Industries (Ditzler) in 1998, so it's probably likely that the full range of Ditzler colour schemes are also utilised within the ICI colour matching process. So basically, ICI have more chances of getting the colour right than anyone else. The trick is, being able to match that unique, half matte / half gloss finish.

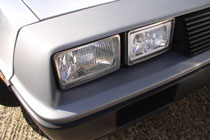
The two pictures show the comparision of my original 'sun-baked' paintwork and the results after the re-paint. The following ICI paint formulation was used to repaint my front fascia :-
ICI Paint Specifications
UNDERCOAT : Grey Undercoat SG05 (Rev. Date 23/12/2003)
Code        Description                Ratio %   Quantity  Cumulative
P565-888    Hi Build Filler Fast       100.0%    1626.00   1626.00
            Only for use with 2K BCT,
            Aquabase and P471

COLOUR : Main Layer P422-8002B (Rev. Date 16/08/1995)
Code        Description                Ratio %   Quantity  Cumulative
P425-986    H/S Medium Ali             58.1%     579.10    579.10
P425-948    H/S Black                  9.1%      90.60     669.70
P425-900    H/S Super White            1.7%      17.00     686.70
P420-952    Fast Blue                  0.4%      4.00      690.70
P420-930    Blue Lake                  2.3%      22.90     713.60
P420-938    Tone Controller            15.6%     155.50    869.10
P192-5600   Flip Controller            12.8%     127.60    996.70

FINISH : Flat Clear M04 (Rev. Date 17/08/1995)
Code        Description                Ratio %   Quantity  Cumulative
P190-XXXX   Clearcoat                  41.7%     418.50    418.50
P100-2020   Flexible Additive          20.8%     208.80    627.30
P565-554    2K Matting Base            37.5%     376.40    1003.70
Binnacle & Instrument Cluster Removal
Tools Needed
- 10mm Socket Wrench
To remove the knee pads. - 7mm Socket Wrench + Extension Piece
To remove the binnacle. - Screwdriver
Cross-Head' (Phillips) type to remove the instrument cluster from the binnacle.
The Procedure
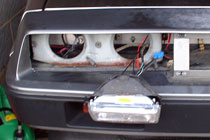
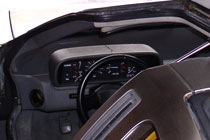
Remove the two driver's side knee pads with the 10mm socket. (8 nuts in total).

Use one of the two knee pads to prop the binnacle up whilst you take a look at all that wiring, etc. (Placed between the steering column and binnacle). The electrical connectors and the speedo cable can be removed easily.
The instrument cluster is held inside the binnacle by four black screws. Remove the screws and carefully pull the instrument cluster out of the binnacle.
To replace everything, follow the above procedure in reverse order.
It may be a good idea to check that the electrical connections and speedo work correctly before fixing the binnacle back onto the dashboard with the 7mm screws and washers.
Electrical Wiring Diagram
Take My Word For It, You'll Definately Need One Of These

The one available from PJ Grady / Zilla is an entire Main DeLorean Schematic with Corrections and Legends incorporated into it.
At a cost of $25 you'll receive a detailed PDF file that can simply be printed in A0 size if you like, also you'll get a Glove box service manual as well to help with common road-side problems.
And if that isn't enough, you'll also be helping Michael J Fox's 'Finding a Cure for Parkinson's Disease' charity, as that $25 goes straight to that charity. So it's worth every penny for two reasons !
John DeLorean Made it, Michael J Fox Made it a Star, Now he Needs Our Support.

Note : Standard Terms & Conditions For The Use Of The Information Contained Within This Document
All Maintenance Procedures Contained Within This Document Have Been Successfully Carried Out On Our VIN.5789. This Does Not Mean That The Above Methods Have Been Fully Tried & Tested For Use On All Other Vehicles. Any Of The Above Procedures Implemented To Other Vehicles, Are Done So, Entirely At The Owners Risk.
All Maintenance Procedures Contained Within This Document Have Been Successfully Carried Out On Our VIN.5789. This Does Not Mean That The Above Methods Have Been Fully Tried & Tested For Use On All Other Vehicles. Any Of The Above Procedures Implemented To Other Vehicles, Are Done So, Entirely At The Owners Risk.
